Friday 22 February 2019

How I upholstered my chairs!

February 22, 2019

Want a new chair now? Without the hassle of getting rid of the old ones?
I got you!


Well, not new-new, but refreshed.

  Right, so a bit of context first:
I DYI'd my way through furnishing my flat, and this is my latest venture. Me and my boyfriend needed decent chairs, but couldn't spend a lot of money. One day, walking down the street we found two chairs saying "free". They were quite sturdy and looked perfect in my living room. But I had to clean the cushions and make them look good somehow.

  And so, I came up with this idea to re-use left ofter curtain fabric (that I had no other use for) to give them a lift! I did forget to take a photo of the original cushions, but to give you an idea, they were dark brownish-red and the fabric had some wear & tear marks. 

Important tip
Do steam-clean and sanitize before thinking of keeping anything second-hand. Your health/safety is more important.


  Thus, today I am sharing with you 1 SIMPLE WAY to upholster any old chair (or even sofa!) with only fabric and one other tool! This is a great project if you have a set of curtains you like but don't see yourself using anymore, or even an old duvet cover with a cool pattern! 

Turns out you can actually save money and decorate your flat just the same - and upholstering a chair isn't even that hard - read through for a simple trick! 


  For this simple DYI, all I used was a staple gun! I'm terrible with hot glue guns, and no good at sewing, so I went for the next best thing, stapling. It does take a bit of finesse, my result wasn't perfect - but it looks very shabby chick (I hope!).

  Excuse my dinossaur hand, ahem.

  You can get a staple gun at any hardware store, or generalist store (like Wilko). Fabric might be more expensive if bought specifically for this; but the purpose of this dyi was to save money, and re-use fabric.

  I was extremely lucky with these chairs, as they were easy to dismantle. It is more challenging to work around weird angles and legs. If you are looking to do this and your chair isn't easily dismantled, make sure to take frequent breaks in order to not over-strain your back. 


  In total, I think I spent about an hour for two chairs. It is very quick to get done. And you can't even see the staples! (Tip: You can easily hide them in the bottom part if you sew along the corners as most times the corner of the cushion will sit on the chair structure and hide the staples from view!)

  One thing to keep in mind, however, is that a heavy duty staple gun is not exactly indicated for upholstery projects. Specially with cushions, since they are usually made of foam, if you try to staple anything to the soft part of the cushion it will not stay.  My tip is to staple along the corners as youºve read above, where the fabric will be thicker and stable enough to hold the staples.

  You can also add extra foam to your cushion, by wrapping the outside (or with glue or staples or even sewing) or the cushion in it before adding your new cushion cover.


Do you have any tips of your own for easy upholstery? If so, leave them down in the comments!


This is a DYI that even the most un-crafty person can try!  As you've seen it is super easy. 
And as you get into the hang of it, there is even youtube videos explaining how to replicate an "invisible stitch" but with staples!


Let me know if you try this easy trick, would love to see your results!

Love,
Vee x
Tuesday 12 February 2019

NO-BAKE Heart Shaped Caramel Shortbreads

February 12, 2019

Stumped for gifts this year? I have a great suggestion for you! 


  Valentine's Day is just around the corner, and a lot of us are wondering what to get our other half. 
  
You're tired of always offering the same sort of gift. 
You're tired of always receiving the same type of gift. 


Fear not, here's my suggestion.

  Okay, just a bit of context first: 

  Me and my boyfriend do not gift each other “material items” - so no going to the shop and picking up something - because we agree there’s other things we could do with the money (travel, go out, etc.). Still, I like gifting him on special occasions, and I'm very crafty!

  So, here I am, wondering what to “give” him when I have the lamest-best-est idea: heart shaped caramel shortbreads! - He’s a big fan of caramel and, well, sweets in general. 

This is also makes up a great Galentine’s gift for your besties ! 

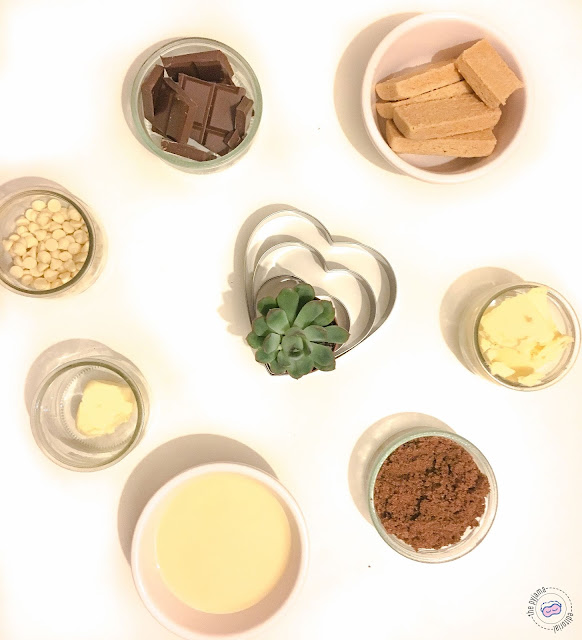
  The only tools you need are some cookie cutters shaped like hearts, a baking sheet or tray, your fridge and greaseproof paper! So easy

  To prepare for your shortbreads:
  1.  line your baking tray, or sheet, with grease proof paper
  2.  place your cookie cutter on top, and line the edges of these with grease proof paper
  Ready, set, bake! You most likely already have a pretty good recipe for shortbreads, but, if you're short, here is the one I used - from the website Carnation - adjusted to the quantities (and love of caramel) I used*!

*Because the boyfriend didn't know I was going to bake and ate half my packet of plain shortbreads

INGRIDIENTS
100g Plain Shortbreads
22g Melted Butter
158.8g Condensed Milk
60g Dark Brown Soft Sugar
60g Butter
22g White Chocolate
80g Dark Chocolate

You can see a more in-depth method in Carnation's website, I'm just going to share a few key points with you:
  1. To crush the shortbreads, put them inside a food-safe bag and roll them with a rolling pin - or leave them out for a day so they get softer - you can basically crush them with your hands. 
  2. Make sure you completely fold the crushed shortbread with the melted butter - at first I felt like I wasn't thourough so I gave it another go.


  3. Use a round flat-ish spoon to help you press the mix into the cookie cutters - you're aiming for a flat surface. Make sure you chill it properly - check how firm the base is.
  4. In this reduced-amount version of the recipe, you'll find the caramel boils faster than usual. Be mindful to keep stirring until you achieve that beautiful golden brown caramel colour. 
  5. Let the caramel cool for a second before spreading on top of the shortbread, so you don't break it. But do not wait too long so it doesn't thicken too much.


  6. The caramel will take longer to chill than the base did. Make sure it is somewhat firm so it does not mix with the chocolate
  7. If you separate the milk and white chocolate into small bowls you can use a large tray or pan to melt them in the same Bain-Marie.
  8. You'll want to spread all of the milk chocolate first and then go in with a spoonful of white chocolate, swirling it around to create a marble effect
  9. Don't worry about the mess! Think of the happiness of eating a delicious shortbread!

  You can make these in about 20 minutes, just remember to properly chill each layer before adding the next one (except the chocolates). They're equal parts delicious and beautiful to look at!

I gifted them in advance to the boyfriend - because I'm going to spend Valentine's Day working - and he deemed them to taste like
Valentine’s Day is everyday from now on”.


What is your favourite Caramel Shortbread recipe?
Do you know what you'll be gifting your other half (or your galentines!)?

Love,
Vee x

Sunday 10 February 2019

Hello, World. + FREEBIE

February 10, 2019
You know that hobby you used to have in high school/university, the one that always makes you go "Oh, I should get back into that, I'll definitly get back into that, soon, ish." ?

 Well I went and actually got back into it.


  I have been blogging on-and-off for a bit over ten years now - wow -, and realized that there's no time like the present to start a new project. 

  I am at a time in my life where I have new experiences I'd love to share - from living in a different country, to baking, lifestyle posts, crafting and DYI - and I'm very excited to share these experiences, stories and recipes with you.

  And sharing and connecting is the reason I wanted to get back into blogging! I've always been a small time blogger, but always engaged with the community and they were some of the most interesting people I've met yet. Also, when thinking and researching about the blog, what took me most time to get right was the name. I didn't want just any old name. I wanted people to relate to my blog and to show them - you guys - what type of person I am. And I'm just an average everyday girl, who loves cozying up on a sofa in her pj's.

  And I know there's more of you out there, who just haven't come up with the perfect name just yet. But you're in luck, for I am sharing my own BLOG NAME WORKBOOK!

 To comemorate the launching of the blog, I am sharing with you the methods I used to come up with my own blog name!


Get yours now!

I'll never send you any spam. Only content that I've created and is somewhat helpful to my readers !
* indicates required

created with mailchimp

I sincerely hope you find it as useful as I did, and if you use it, let me know what was the result!

  I cannot wait to get started on this journey again! If you want to come along with me, merely follow me on any of the blog's social media channels or on bloglovin' to receive all posts to come - a new one coming on Tuesday, just in time for Valentine's Day!

Love,
Vee x